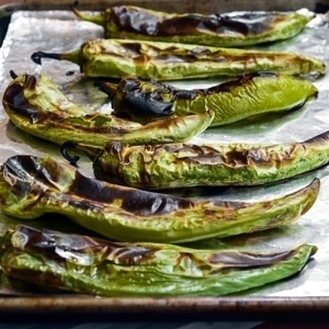
How To Roast and Freeze Green Chiles
|
Ingredients
Green chiles Equipment Towel for drying Oven broiler Baking sheet(s) Aluminum foil Tongs Paper bag, food-safe plastic bag, or heat-safe covered bowl Freezer bag(s) or shallow, freezer-safe container(s) Cutting board (optional) Knife (optional) Spoon (optional) Gloves to protect your hands (optional) |
Instructions
- Select fresh chiles that are heavy, smooth, and crisp. Straight and flat chiles, as opposed to curled ones, roast more evenly. Plan to roast the chiles within a few days of picking or purchasing them.
- Position a rack 4 to 6 inches below the heating element of your broiler and preheat to high or 400° to 450°F.
- Rinse the chiles and dry them with a towel.
- Arrange the chiles in a single layer on an aluminum foil-lined baking sheet(s).
- Place the chiles under the broiler and roast until the skin is charred and blistered, about 3 to 5 minutes. Avoid completely blackening the chiles; you're looking for them to be about 60% to 70% charred.
- Using tongs, flip the chiles over and broil on the other side until the skin is charred and blistered, about 3 to 5 minutes. Again, avoid completely blackening the chiles; you're looking for them to be about 60% to 70% charred.
- Remove the chiles from the broiler and place them in a paper bag, food-safe plastic bag, or heat-safe bowl. Close the bag or cover the bowl, and let stand for 10 to 15 minutes. The steam will help loosen the peel from the chiles.
- Peel, seed, chop (optional): The chiles may be peeled and seeded prior to freezing or later, as needed. You may wish to wear gloves to protect your hands, especially if you are processing a large quantity of chiles. To peel, pull the skin off the chile; it should come off fairly easily, but you can use a knife to cut away any stubborn bits. Seeds and membranes are most easily scraped out with a spoon. If you want, you can also chop the chiles into smaller pieces.
- Chiles should be completely cool before freezing them. For food safety, whole chiles can be cooled at room temperature for up to 2 hours after roasting them, or refrigerated for up to 3 days. Seeded or chopped chiles are generally cool enough by the time you finish processing them.
- Use plastic freezer bags or shallow containers, which help prevent freezer burn. Arrange whole chiles in a single, flat layer to ensure even freezing and to prevent them from sticking together. If using bags, press as much air out as possible. Alternatively, you can freeze the chiles in a single layer on a tray, then transfer them to a container once frozen solid. Chopped chiles may be frozen in ice cube trays and then transferred to a container.
- Store the chiles in the freezer for up to a year and thaw in the refrigerator before using.
